Did you see my easy peasy fiber pots turned Easter Baskets over on I heart Naptime last week?
Well just in case you didn’t get a chance to click on over there, here it is for your reading and crafting pleasure.
Thank you Jamielyn for having me over on your wonderful blog!!
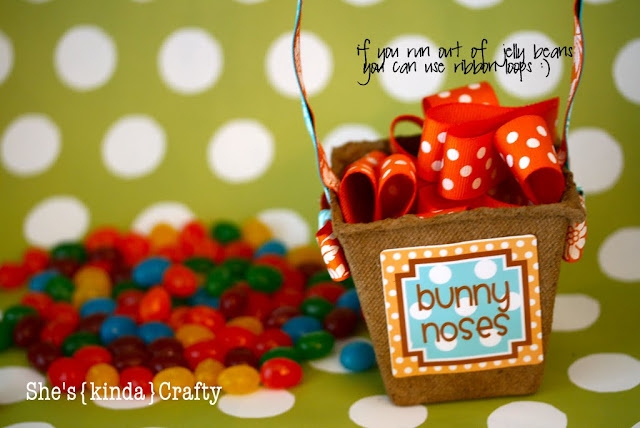
Today we are going to make little Easter treat baskets on the cheap! Anders Ruff Custom Designs made some large Easter basket out of planters for the Easter has Sprung photo shoot (that I am SO proud to have contributed to) and I thought it would be really fun to make a smaller version once I saw this cute seed starter pots at Target (I believe they will be doing a tutorial on their large baskets at some point). These would be great to make in mass for school, church, neighbors, whomever you want to give yummy spring time treats to!
You only need a few supplies:

- Fiber Pots (seed starters) – I found mine at Target, 10 for under $2, but any garden or home improvement place would have them
- Floral wire – I used what I had on hand, 20 gauge (it’s a little thicker than you need but it works)
- Ribbon (or Ribbons depending on which way you want to go)
- A pretty tag (supplied below!)
- Glue – I used Beacon’s 3 in 1 advanced craft glue, love the stuff!!!
- Hole punch – optional
Now that you’ve gathered all your goodies let’s get started
- you want to start by cutting 1 piece of floral wire and 2 pieces of ribbon to 13 inch length
- run a line of glue down the center of the back side of one ribbon starting and stopping ½” from each end and lay your floral wire on top of the ribbon (adhering the wire to the ribbon)
- run a line of glue both above and below your wire as close to the edge as you can get it (again
starting and stopping ½” from the ends) - lay your other ribbon, wrong side down, on top of your ribbon/wire combo making a wire
sandwich with your ribbon.

- If you have a hole punch, punch a small hole about ½” down from the top on 2 opposite sides of your pot (if you don’t have a whole punch just use your floral wire to make a hole)
- Working from the outside insert the ends of your floral wire into the holes about ½”. To secure the wire bend that ½” you just inserted into the pot up towards the top. Repeat on opposite side


- Used a small dab of glue to glue down all four loose ribbon ends (the inside ribbons will cover up your folded floral wire)


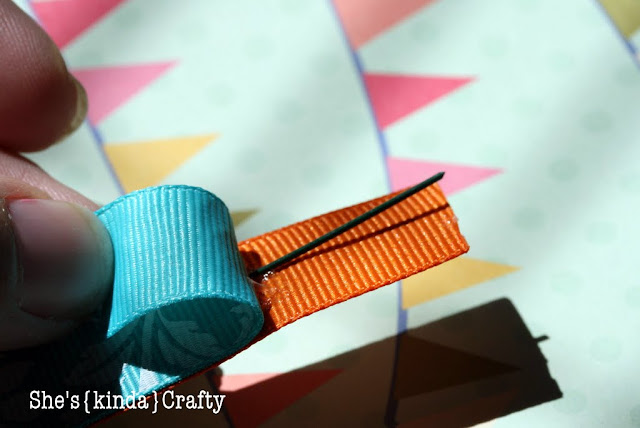
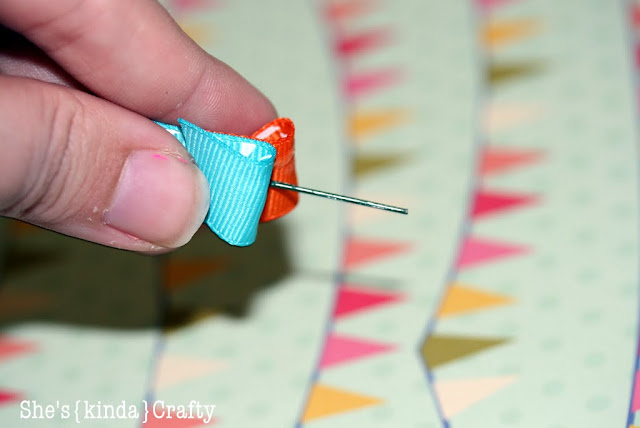
- Add any type of embellishments you’d like to your pots. I made little bows and glued them over
the ribbon ends but you can do whatever you’d like or nothing at all!

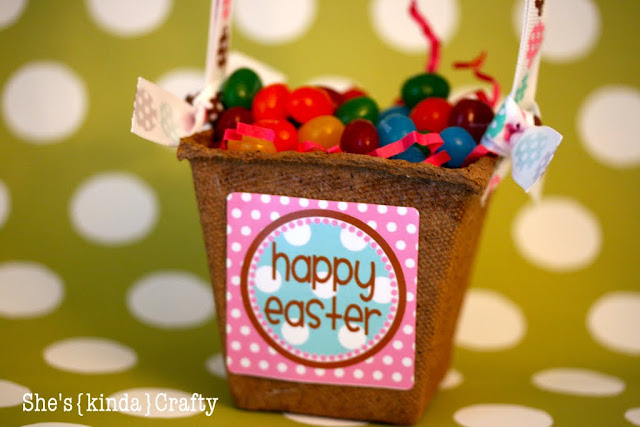
- Print out any fun printable you’d like (I’ve included 3 different designs at the bottom of the post for your personal use, but feel free to use anything you’d like) and glue it to the pot or attach it with some twine.
- Fill with candy and other goodies
- Open your arms wide for all the hugs you’re gonna receive!!!


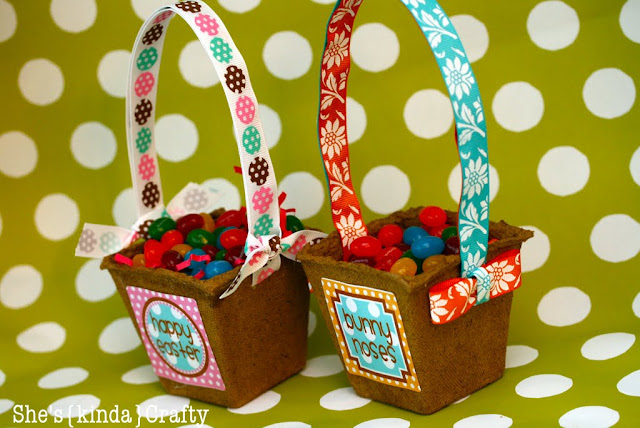
So that is basically it! As you can see I did 2 different variations and I can’t decide which one I like more!
You can click HERE, HERE, & HERE to download your free printable tags!!!
I hope you’ve enjoyed my little tutorial and that you’ll come visit me sometime over at She’s{kinda}
Crafty!!!


So very cute!! What fun little treats for my kiddo’s friends 🙂 Thank you so much for the idea!
Found you through Serenity Now!
~meri
I love this idea! Thanks so much for sharing it with us. I even think I might have all of the supplies on hand to make some this weekend.
This is so cute! I bought the containers today. I can’t make baskets with them so I am going to have my kids decorate them with ribbon and then we are going to plant some flowers to give to moms for mothers day. Have been looking for these containers forever though! Thanks for the heads up!
ooh! These are SO cute! The little bows on the side were a nice touch! Thanks for sharing! 🙂 Best, Michelle
So glad I found your blog!! This is a GREAT way to use some of my bare metal headbands and misc. ribbon! I just LOVE projects I can make with things around the house! 🙂
Stacy, what a great tutorial! 🙂 I love the pretty ribbon you picked out. These would be fun gifts for preschool teachers!
Thanks so much for joinking my Weekeend Bloggy Reading party. If you could add a link back to me too, I’d greatly appreciate it. 🙂
I made my own this weekend and love them! Thanks so much for the tutorial.
I’d love it if you took a peak at my version.
http://virginiasweetpea.blogspot.com/2011/04/easter-treat-baskets.html
How cute! And I love that it doesn’t cost a fortune or take 6 hours to make! =o)
This is the cutest thing ever! I love it!
Oh My! How cute : )
So Adorable!!
I would love it if you would link it up to our What I Made Wednesday Linky Party!!
Also, stop in for a chance to win our 100 Follower Giveaway {{Beaded Watch & Hobby Lobby Gift Card}}
Alisa
Sweet Peas and Bumblebees
sweetpeasandbb.blogspot.com