
The supplies for this project are simple (I happened to have them all on hand but that’s because I am a craft hoarder).
- White or light colored grosgrain ribbon
- printable heat transfer paper for light fabrics
- a computer and printer
- Iron
- Paper trimmer or scissors and a steady hand

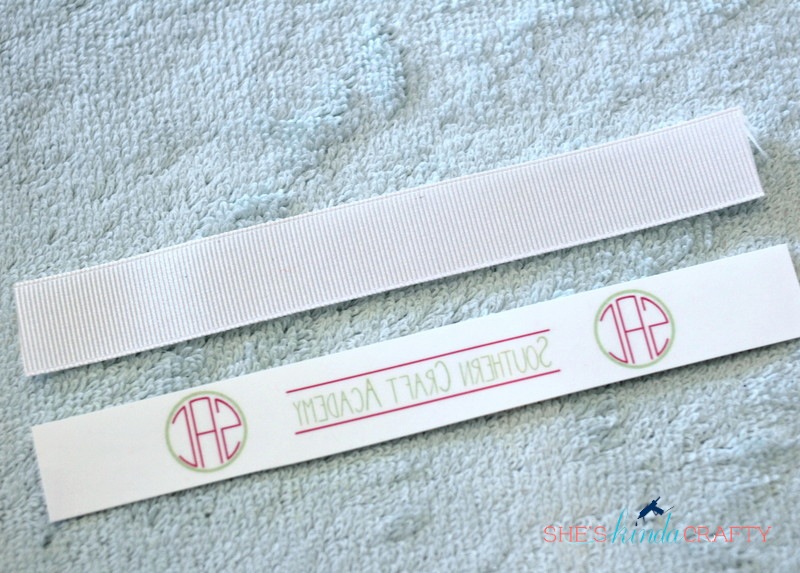
Open up your favorite designing software on your computer (even if it’s just MS Powerpoint or MS Paint). Create the image and text you want on your ribbon in real size meaning, measure your ribbon width and draw a rectangle in your design software to mimic the size of your ribbon. Then type in that rectangle, add graphics, clip art, monograms, whatever you want to “print” on your ribbon. Remember that this is normal 8.5″ x11″ paper, and you’ll need room for borders if you don’t have borderless printing options on your printer, so keep your design in according to those dimensions. My pieces of ribbon were 6″ long and my ribbon was .75″ wide so I drew a rectangle of those dimensions and designed my Southern Craft Academy graphics to size. I was able to fit 11 strips on 1 sheet of paper.
**Most Important Part** You must FLIP your design before you print it. Some printers will do this automatically for you if you select Iron-On Transfer as your type of Paper, but PLEASE check out the preview of your page BEFORE you print to make sure everything is backwards!!

Using your paper trimmer (mine is REALLY dirty from 8 years of use), cut out your strips of transfer paper to the exact size of your ribbon. The reason to make them the exact size instead of trimming off those blank edges is that the transfer paper & process will discolor your ribbon slightly, using the exact dimensions will make the entire ribbon look the same color.
If you are doing this process to a long stretch of ribbon simple but the edges together of your transfer papers.
You’ll want to do these next steps on a table or other hard surface protected by a towel (thus the weird texture background in these photos). An ironing board just doesn’t give you the resistance you need.

Line your transfer paper up on top of you ribbon, printed side down.

According to the package direction iron the paper onto the ribbon.

Once the paper/ribbon has cooled, slowly peel back the paper.

BAM! You’ve got yourself some custom ribbon!!

Or maybe you have a BUNCH of custom ribbons!


This technique could create all kinds of personalized ribbons for weddings, holidays, birthdays, etc. Thanks for the great how-to!
I appreciate your posting this. DIY lovers are going to love this easy to learn tips on how to customize print on ribbon. 🙂
Ed of ITWThermalFilms.com
Wow! What a neat idea! And I love the finished product. 🙂
Thanks so much for sharing. I’ve been searching for this online and couldn’t find anything. Really appreciate it!!!
Thanks! Looking good..That’s what inspired me to make the huge custom printed labels. I think those ribbon add a nice touch.
custom printed labels
This is so helpful! One question, where did you find your Printable Heat Transfer Material for Light Fabrics?
How do you FLIP the letters?
you have to mirror the design. most printers have the option to mirror within the settings.