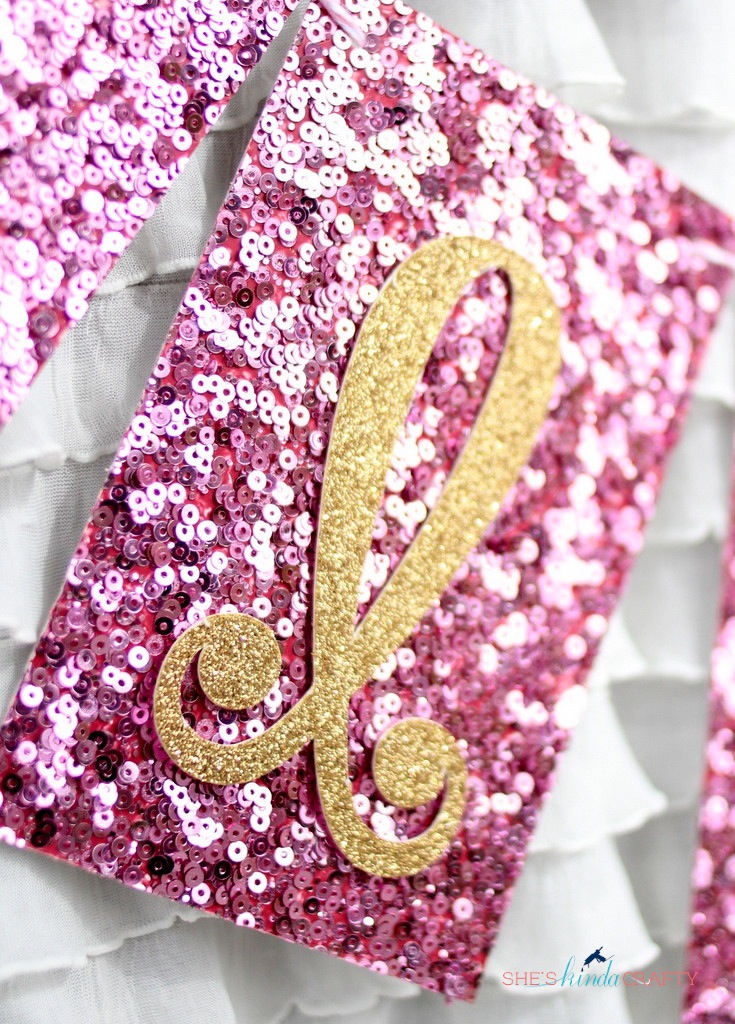
My inspiration for this banner was this AMAZING sequins paper I ran across at the craft store. When I saw it I instantly reached for it even though I had no use for it. It was coming home with me, even if it was just for me to stare at on gloomy days. I really hope it comes in other colors because I want to make sequins banners for everything now! And what better to show off sequins than glitter card stock.
I have had several people on Facebook ask me how I was able to cut glitter card stock on my Silhouette so I thought this would be a great time to show you a couple of my favorite tips.

1) Always set your blade to 10.

2) always set your cutter to double cut and slow the speed WAY down. If you are using thick glitter card stock, go down to 2.

3) Make sure that your mat is super sticky – you don’t want ANY shifting of the paper to occur.

4) After the machine is done double cutting DO NOT UNLOAD THE MAT until you have tested out the card stock by lifting it off the mat to make sure the cut went through. You will NEVER be able to line up the mat in the exact same spot ever again once you hit “unload”, EVER. So always test it out. In this case, you can see it didn’t cut all the way through, so I sent it back through again.
So those are my 4 main tips for cutting out glitter card stock with your Silhouette craft cutter. Please note that I have a separate cutting mat for glitter card stock because it does get messy. Also, I would never attempt to cut out the sequins card stock I used as the backing in this banner in my machine. I simply cut out 4×6 squares with a paper trimmer.
Now on to the Love Banner!! – I picked 4 different fonts to give it a little whimsy, but sized them all the same to keep the coordination.


Gorgeous! I love everything about it!!!!
I saw that same paper and was almost as in LOVE as my 3 year old! I think I’ll be making a run back to the store and whip up some simple Valentine cards with it. Thanks for inspiring!!!
Oh! I forgot to ask, HOW DID YOU GET THE GLITTER CARDSTOCK TO STICK ON TO THE SEQUINS!?!?!
Good Old Fashion scrapbook double-sided tape!!
LOVE your tips on cutting card stock. I swear I was going to ask you as I struggle with cutting it on my silhouette. You are awesome! xoxo
I love the paper. Where can find i?
this banner is GORGEOUS – love this!!
Love the simplicity of the project, yet classy with the glitter and sequins. Thanks for the tips on cutting as I just got a Silhoutte machine.
there are no words. this is ridiculously amazing.
LOVE IT!
This is so adorable, Stacy! Great tips, too. And your daughter has a WONDERFUL birthday. 😉 😉
This is soooo cute Stacy! And thanks for the Silhouette tips!
WOW this is pretty! I want to do this!
I would love if you link this to my party happening now!
XO
Isabelle
http://lechateaudesfleurs.blogspot.com/
oh dear, I went to 10 with the blade and totally cut through my mat. 🙁
I love this Stacy…could you please let me know where you got your glitter cardstock. Been having a hard time finding some
Ore, did you find a reasonable supplier for gold glitter card stock? I’m on the hunt, too!
I like to stock up at Michael’s or Hobby Lobby when they have a sale.
I have tried to glue items on glitter card stock and i can’t get it to stick. what kind of adhesive did you use?
I used hot glue!
this didn’t work for me at all 🙁 it sounded like it jammed
Im worried about destroying my blade. Did it dull or damage yours? Or do you have a separate blade you use for glitter cardstock?
If you are going to do a LOT of glitter paper cutting I would say keep 2 blades, use your oldest blade for the glitter. However if you are just doing it occasionally I haven’t seen a big difference in how it dulls my blade since all paper dulls your blade eventually.
THANK YOU so much for the info on cutting glitter card stock with the Silhouette. I was scared to just give it a go with out knowing if it would damage my machine. I am working on a birthday party ensemble for a customer and can now breathe a sigh of relief knowing that I can cut out gold glittered crowns now! Thank you again!