Shes {kinda} Crafty

Dedicated to All Things {kinda} Crafty

  • Home
  • Blog
  • About Me
  • Shop
  • Wreaths
  • As Seen On
  • Privacy Policy

20 Minute Tuesday | Mini Key Fobs

April 23, 2013 By Stacy 7 Comments

If you’ve spent any time on Pinterest you know that Teacher Appreciation week is coming up in a couple weeks (May 6 – 10, 2013).  Some people go all out with 1 big gift but we are saving that for the end of the year and instead we are doing a couple little fun things through the week. These mini fobs are fun gift add-ons year round, great stocking stuffers, and would make awesome party favors, too!

 I am sure you’ve see the full size key fobs out there and while they are fun, they are large, and bulky and end up tickling my leg while I drive. Also, I hate buying and sewing webbing, another downside to the large key fobs. So when I found these great 3/4″ key fob hardware pairs on Etsy I just had to try them out! I ended up making and handing out 25 of them for Blog Fete last year because I loved them so much. A simple search for “Mini Key Fobs” in Etsy will find you several suppliers selling them at reasonable prices. 

Supplies:

  • 7/8″ ribbon – Two 7″ pieces of ribbon per key fob
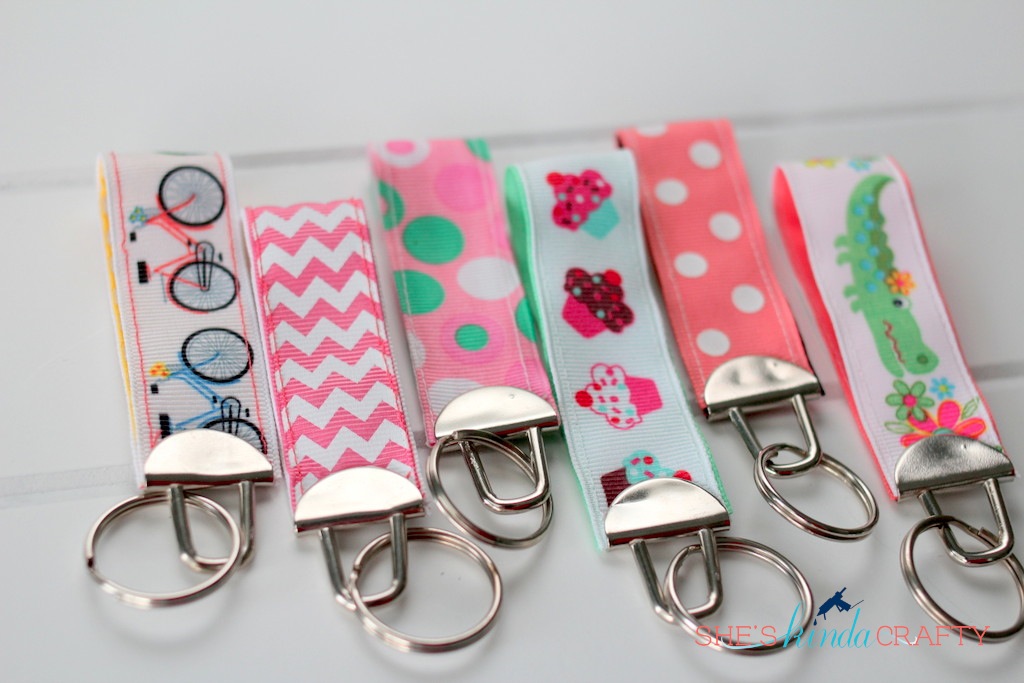
  • mini key fob set
  • Pliers that you’ve prepared for key fob making (instructions below)
  • sewing machine & matching thread (or iron on hem tape/stitch witch)
  • optional – free gift tags (links at bottoms)

In order to make sure your pliers (or the pliers you steal from your husband) don’t make marks on your key fob hardware you’ll need to prep them a little first. I wrapped some painters tape around the teeth of the pliers, followed by some ribbon scraps and then another layer of painters tape to hold it all together. I know it looks a little ugly but it gets the job done! They also sell specialty key fob setting pliers at craft stores and online but these were free (or under $10 at the hardware store).

Lay your 2 pieces of ribbon wrong sides together and sew all the way around as close to the edge as you can get or use the appropriate width hem tape and iron following the directions iron your ribbon together. Just be careful ironing your ribbon as most is polyester and can melt if the iron is too hot – every spool should tell you the ribbon’s fiber content so test out a piece first!

Decide which ribbon you want showing on the outside, fold the sewn ribbon in half and sew the edges together creating a loop (back sew a couple times to get a tight connection). You’ll want to sew as close to the edge as possible to hide the stitching with the key fob hardware. Again, if you are going the no-sew method just use a small piece of hem tape to accomplish this step, you could probably try skipping it all together if you wanted.

Place your hardware inside the plier and clamp down enough that the plier is holding the hardware for you. Then, insert the sewn edge into the mouth of the hardware and clamp down as much as possible. To finish the clamping, move your pliers to a perpendicular position towards to the end of the hardware and clamp down til the hardware is completely closed on the ribbon. However, don’t press down too hard because the teeth on the back hardware will pop through the front of the key fob.

Once you get it going you can pop a punch of these babies out in no time! These are great if you are a ribbon scrap hoarder, too, because it’s ok if you don’t have exactly 7 inches of ribbon, you can make them to any size you want and now you can carry around your favorite ribbon everyday. On the flipside since it only takes 6-7 inches of ribbon you can also spare some of your most coveted ribbons to use on this project to make others feel special, too!

Of course I couldn’t resist is cheesy tag to go along with the project so if you’d like to tell your child’s teach how FOBulous you think they are you can download this fun tag here for free.

If you aren’t feeling quite as cheesy I also have these tags for you in 3 colors.

Teachers truly are FOBulous so let them know you think so, too!
linked up – tatertots and jello

Related posts:

Default Thumbnail20 Minute Tuesday Follow Up | Painted Mason Jar Default Thumbnail20 Minute Tuesday | Valentine Craft Stash Default Thumbnail20 Minute Tuesday | Chipboard Mother’s Day Frame Default Thumbnail20 Minute Tuesday | Houseguest Prep

Filed Under: Uncategorized

← Blinged Sunglasses for Summer | #gemzandbling Keep on Track | Blogging Income and Expense Spreadsheet →

Comments

  1. Deliciously Darling Events says

    April 23, 2013 at 5:59 pm

    I heart this!!! Still have my keyfob that you passed out at blogfete on my key chain right now. It makes me smile when i look at it. YOU ROCK!

    Reply
  2. Liesl Castles says

    April 25, 2013 at 5:04 pm

    This is absolutely beautiful – i love your ribbon – where do you get your ribbon from?

    Reply
  3. Michelle @ Sweet Something Design says

    April 27, 2013 at 1:22 am

    Love this! What an easy and great gift, nice job!

    Reply
  4. Keep Calm and Decorate says

    April 27, 2013 at 11:54 am

    These are fantastic! I have always wanted to make these but could never find a good tutorial. Thanks for the great instructions.

    Reply
  5. Momof4Savings says

    May 6, 2013 at 7:21 pm

    Where can I buy the metal claps? I went to michaels and couldn’t find them

    Reply
    • Stacy @ She's {kinda} Crafty says

      May 6, 2013 at 7:26 pm

      I don’t believe you can buy them from a store, I found mine on Etsy as mentioned above.
      Happy Crafting,
      Stacy

      Reply
    • Katrina Largent says

      April 28, 2014 at 8:22 pm

      This comment has been removed by the author.

      Reply

Leave a Reply Cancel reply

Your email address will not be published. Required fields are marked *

CommentLuv badgeShow more posts

Welcome! {I’m Stacy.}


Good time, great laughs, and lots of crafts!
I am a full-time working momma of 2 adorable and funny and fully southern little ladies. I like to think that everyone has a crafty side, even if it's only kinda crafty.

{find it}

{follow via Email}

Enter your email address to subscribe to this blog and receive notifications of new posts by email.

Google+ Badge

{previous posts}

Rivit Media Publisher

{Popular Posts}

  • Time for a Quiz | Father's Day Free Printables
  • Custom Ribbon | How to Print on Ribbon
  • Camping Pillow Tutorial | Ann Kelle Fabrics
  • DIY Stripes and Glitter Mason Jar
  • Can We Play? | Last Day of School Cards

{Facebook}

Unable to display Facebook posts.
Show error

Error: (#200) Provide valid app ID
Type: OAuthException
Code: 200
Please refer to our Error Message Reference.

{Instagram}

{Pinterest}

Follow Me on Pinterest

Copyright © 2025 · Daily Dish Pro Theme on Genesis Framework · WordPress · Log in