Shes {kinda} Crafty

Dedicated to All Things {kinda} Crafty

  • Home
  • Blog
  • About Me
  • Shop
  • Wreaths
  • As Seen On
  • Privacy Policy

20 Minute Tuesday | Jeweled Hair Ties

May 14, 2013 By Stacy 5 Comments

Summertime and livin’s easy…unless you have long, thick hair and live in the south, like me. Summertime if great but it basically means big hair that just gets pulled back in a pony tail within an hour of starting my day. Hair elastics have been my staple “bracelet” for years and now that I have 2 little girls with long hair, it’s a hair elastic party on my wrist. Since we need them close at hand, let’s at least make those hair elastics fun and pretty!
Enter the Jeweled Fold Over Elastic hair tie!

Jeweled FOE Hair tie tutorial

On a boring, routine shopping trip to my local Walmart I came across these fun, new beads and they just had to come home with me. Recently I went a little fold over elastic (FOE as it’s called) crazy and bought about 10 yards of random colors, patterns, and sparkly FOE. They make great hair ties that don’t cut off the circulation on your wrists and leave less of a crease in your hair. However, they can be a bit boring. Adding 1 of this little beads to your FOE gives a fun, fresh, and glamorous look to an otherwise utilitarian object.

Jeweled FOE Hair tie tutorial

Supplies:

  • Fold Over Elastic (you can find some plain colors at your local fabric store but the patterned and glittery ones can be found online through simple google or etsy.com search for “fold over elastic”)
  • Beads with large openings
  • Scissors for cutting FOE

For the non-shimmery elastics you’ll need about 9 inches of elastic (that’s 4 hair ties per yard!) and 1 bead.

Jeweled FOE Hair tie tutorial

Just slip the bead onto the FOE, slide it to the middle,  and fold your FOE in half. With both ends together, make a knot in the FOE. To seal the ends, run a lighter LIGHTLY over the raw edge of the elastic. BINGO, you’re done!!

After making a few with kid friendly beads I decided that these would be really fun to give out to some of your friend on the last day of school…you know, so they can keep cool! So I made this little printable tag that you can use to wrap 2 or 3 hair ties around. To be more cost effective you can give 2 plain and 1 jeweled hair tie as well and the 3 jeweled ones I show in the photos.

Jeweled FOE Hair tie tutorial

You can make more upscale, grown-up hair ties using more appropriate style beads and FOE colors.
If you buy the shimmery, glittered elastics you’ll need more like 10″ per hair tie, maybe slightly more, because they have much less stretch and give.

Jeweled FOE Hair tie tutorial

Jeweled FOE Hair tie tutorial

Jeweled FOE Hair tie tutorial

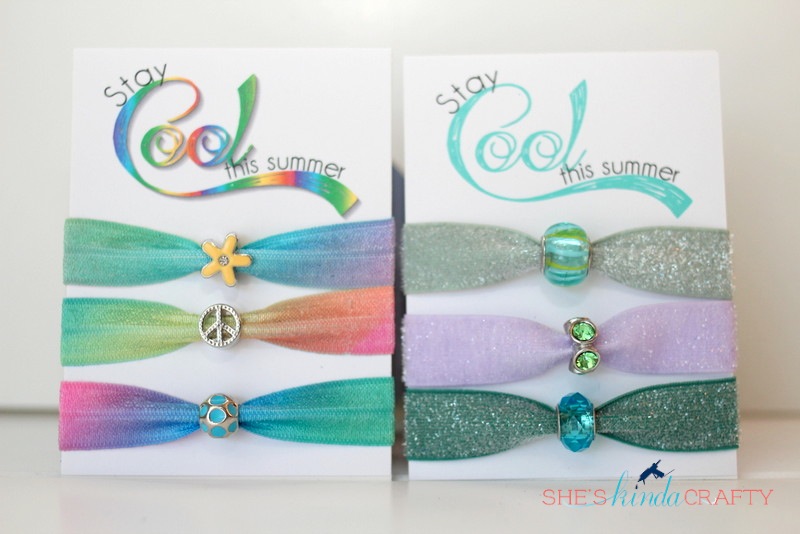
To help the white cardstock stay straight with the hair ties on it I slipped in a little piece of glittered cardstock on the back, just make sure it’s the really thick, stiff stuff!

Jeweled FOE Hair tie tutorial

If you’d like to download the gift tags you can find the files HERE (aqua) and HERE (rainbow) just remember that they are for personal use only and are not to be altered, edited, or sold in any way.
Make sure you order a couple extra yards of FOE for yourself (and a couple fun beads, too) because they are slightly addicting to make and oh so necessary for summer!
Linked up:
seven thirty three | Bloom Designs | tatertots and jello 

Related posts:

Default Thumbnail20 Minute Tuesday | Valentine Craft Stash Default Thumbnail20 Minute Tuesday | Gumball Corsage Default Thumbnail20 Minute Tuesday | Fall Felt Flowers Default Thumbnail20 Minute Tuesday | DIY Faux Chalkboard

Filed Under: Back to School, DIY, party favors, tutorial

← DIY Chalk Apron | Ann Kelle Fabrics Southern Craft Academy | Sponsorship Opportunites →

Comments

  1. Angela Hamilton says

    May 14, 2013 at 6:52 pm

    Where did you get your FOE?

    Reply
    • Stacy @ She's {kinda} Crafty says

      May 18, 2013 at 12:00 am

      I found mine on Etsy

      Reply
  2. Nicki says

    May 14, 2013 at 7:09 pm

    I’ve made these hair ties before and LOVE them, but adding the jewels is a great extra touch! Perfect add-ons to gifts! 🙂

    Reply
  3. rebecca @ older and wisor says

    May 18, 2013 at 12:08 am

    These would look *so cute* looped around a gift card! Guess what my nieces will be getting in the mail from now on? 🙂

    Reply
  4. TitiCrafty by Camila says

    May 19, 2013 at 4:03 pm

    I love them all!!! They must look so nice! It would be so cool if you could join my Link Party on Sundays!

    Hope you are having a lovely day

    Hugs
    Cami @ TitiCrafty by Camila

    Reply

Leave a Reply Cancel reply

Your email address will not be published. Required fields are marked *

CommentLuv badgeShow more posts

Welcome! {I’m Stacy.}


Good time, great laughs, and lots of crafts!
I am a full-time working momma of 2 adorable and funny and fully southern little ladies. I like to think that everyone has a crafty side, even if it's only kinda crafty.

{find it}

{follow via Email}

Enter your email address to subscribe to this blog and receive notifications of new posts by email.

Google+ Badge

{previous posts}

Rivit Media Publisher

{Popular Posts}

  • Time for a Quiz | Father's Day Free Printables
  • Custom Ribbon | How to Print on Ribbon
  • Camping Pillow Tutorial | Ann Kelle Fabrics
  • DIY Stripes and Glitter Mason Jar
  • Can We Play? | Last Day of School Cards

{Facebook}

Unable to display Facebook posts.
Show error

Error: (#200) Provide valid app ID
Type: OAuthException
Code: 200
Please refer to our Error Message Reference.

{Instagram}

{Pinterest}

Follow Me on Pinterest

Copyright © 2025 · Daily Dish Pro Theme on Genesis Framework · WordPress · Log in