Shes {kinda} Crafty

Dedicated to All Things {kinda} Crafty

  • Home
  • Blog
  • About Me
  • Shop
  • Wreaths
  • As Seen On
  • Privacy Policy

20 Minute Tuesday | Shaped Cork Board

July 16, 2013 By Stacy 4 Comments

Yay!! It’s a new 20 Minute Tuesday post! I have cheerleading camp to thank for allowing me the opportunity to come up with a new project to share with you. So, Go Fight Win cheerleading camp, you rock!

Bulletin Board Tutorial

Supplies:

  • 12×12 cork tile
  • shaped chipboard (purchased at Hobby Lobby)
  • sharpie/marker
  • exacto knife or scissors
  • contact cement
  • optional – ribbon for hanging 
  • optional – twine or ribbon for edging

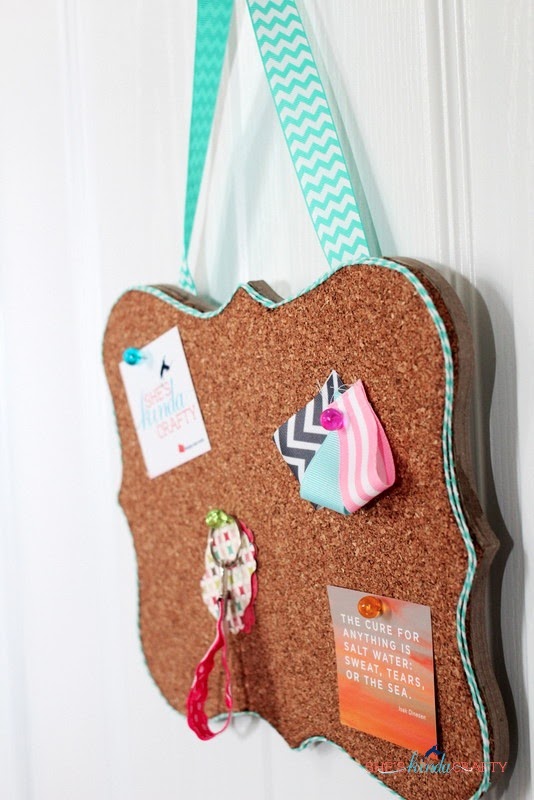
Simply trace your object onto your cork tile. Use an exacto knife or scissors to cut out the cork board. Follow the directions on the bottle of contact cement to glue your 2 shapes together. Badda Bing, Badda Boom – you’re done! A couple optional steps you can take are to attach ribbon to the back of your chipboard and to edge your cork in twine or skinny ribbon.

 Now I have a place to pin up inspiration, business cards, little things I can’t seem to toss out but serve no purpose.

I used a little contact cement to help me outline my cork in twine, I thought it gave it a more finished look, but it’s not necessary.

These would make really fun gifts, especially for the tween and teen set, you could do smaller ones for your locker or dorm or sorority house room!
linked up:  tatertots & jello  Serenity Now

Related posts:

Default ThumbnailFramed {Cork} Board! Default Thumbnail20 Minute Tuesday | Travel Dry Erase Board Default Thumbnail20 Minute Tuesday | Gumball Corsage Default Thumbnail20 Minute Tuesday | Chipboard Mother’s Day Frame

Filed Under: DIY, frame, gift ideas, home decor, kids, ribbon, tutorial

← She’s Kinda Crafty Goes Back to London | Travel Photos What The?!? Wednesday | Washi Tape Tip →

Comments

  1. Danielle says

    July 16, 2013 at 5:23 pm

    I like this – super cute, super easy !
    thanks for sharing ! 🙂
    Danielle – http://craftplaylove.com

    Reply
  2. Peggy Houston, TX says

    July 17, 2013 at 1:34 am

    Love the double twine outline… makes it look so custom. Very cute – thanks for sharing.

    Reply
  3. anonymous says

    December 11, 2013 at 11:26 pm

    How is the ribbon attached on the back?

    Reply
  4. Rivers of Water says

    February 10, 2014 at 5:05 pm

    I am possibly looking to do something like this as door prizes for a Mother Daughter Luncheon in May. Would you be able to share how wide your ribbon is that it is hung by? I am interested is well in knowing how you fixed the ribbon to the back side. Thank you so much for your help.Blessings, Melissa

    Reply

Leave a Reply Cancel reply

Your email address will not be published. Required fields are marked *

CommentLuv badgeShow more posts

Welcome! {I’m Stacy.}


Good time, great laughs, and lots of crafts!
I am a full-time working momma of 2 adorable and funny and fully southern little ladies. I like to think that everyone has a crafty side, even if it's only kinda crafty.

{find it}

{follow via Email}

Enter your email address to subscribe to this blog and receive notifications of new posts by email.

Google+ Badge

{previous posts}

Rivit Media Publisher

{Popular Posts}

  • Time for a Quiz | Father's Day Free Printables
  • Custom Ribbon | How to Print on Ribbon
  • Camping Pillow Tutorial | Ann Kelle Fabrics
  • Can We Play? | Last Day of School Cards
  • DIY Stripes and Glitter Mason Jar

{Facebook}

Unable to display Facebook posts.
Show error

Error: (#200) Provide valid app ID
Type: OAuthException
Code: 200
Please refer to our Error Message Reference.

{Instagram}

{Pinterest}

Follow Me on Pinterest

Copyright © 2025 · Daily Dish Pro Theme on Genesis Framework · WordPress · Log in