Shes {kinda} Crafty

Dedicated to All Things {kinda} Crafty

  • Home
  • Blog
  • About Me
  • Shop
  • Wreaths
  • As Seen On
  • Privacy Policy

DIY Outdoor Party Bucket with Mod Podge

October 11, 2013 By Stacy 9 Comments

Fall is a great time to be outdoors here in North Carolina, as I am sure it is in most places across the country. The humidity is gone, as are those pesky bug, the air is cool, the leaves are a gorgeous pallet of warm colors. It’s the perfect time for outdoor entertaining and this year we are trying out our first kid’s Halloween Party! We are very excited to party but first I have a bunch of DIY’s to do. Thankfully Mod Podge sent me a great box of products to try including Mod Podge Outdoor formula which I used to make an Outdoor Party Bucket that matches my party theme!

If you haven’t used Outdoor Mod Podge Halloween is the perfect time to try it out. You can use it on real pumpkins, fake pumpkins, wreaths, front porch decor items, and, of course, party and entertaining decor! It is thicker than it’s regular formula cousin and allows you the same great water-based glue, sealer, and finish that can be used to decoupage items that will be exposed to the elements outside.  You use it just as you would any Mod Podge formula to decoupage paper or fabric to your surface. For this party I wanted my drink bucket to match the party printables that I am using but I didn’t want to spend a lot of money so I DIY’ed it! Keep on reading to get the full tutorial on how to make your own Outdoor Party Bucket with Mod Podge Outdoor.

Supplies:

  • Metal bucket from the home improvement store
  • Outdoor formula Mod Podge
  • Foam brushes
  • Paint
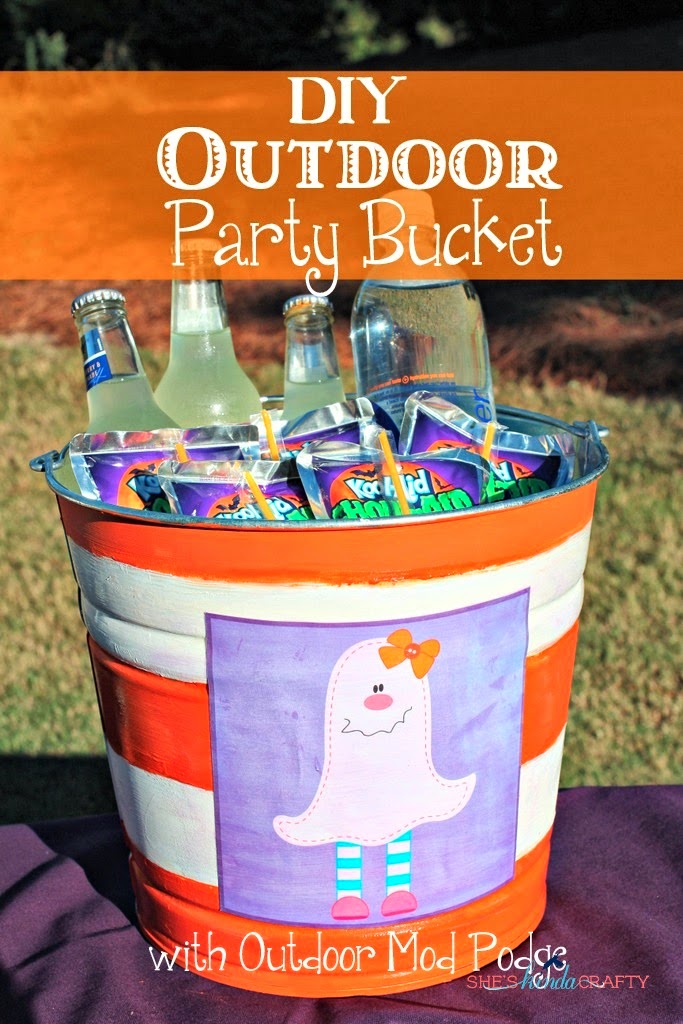
  • Paper or Fabric to customize your Party Bucket (mine is a banner piece from Lauren McKinsey)

I used the 10 quart bucket and started by painting stripes directly to the bucket with craft paint to be my background.

When your background is dry bring out your Mod Podge Outdoor, a clean foam brush, and the piece you want to decoupage.


Apply a nice coat of Mod Podge Outdoor directly to the bucket and then place your print out on top smoothing out any air bubbles.

Don’t worry about any extra Mod Podge that you might see on the bucket when it is wet, it dries clear.

Let everything dry for 30 minutes and then apply a thin coat of Mod Podge Outdoor over your entire print out. Let dry another 30 minutes and repeat.

Add ice and drinks and now you are ready to party!

Even when the bucket starts to “sweat” a little from the ice your decoupaged personalization won’t go anywhere.

If you want to learn more about Mod Podge Outdoor you can:

  • Get ideas from fellow crafters on Plaid’s Facebook Page
  • Follow Plaid for Inspiration on Pinterest
  • Visit any of these great projects by my fellow Mod Podge friends


***Full Disclosure – this post was sponsored by Blueprint Social and Plaid but all my thoughts about the product and the project are 100% mine and something that I thought you’d find helpful in your crafting endeavors, especially this Halloween!!

Linking up – tatertots and jello


Related posts:

Default Thumbnail2013 Bucket List | Free Printable Default ThumbnailMod Podge, I still don’t {LOVE} you Default ThumbnailMod Podge Collage Clay Decoden Frame Default ThumbnailWhat {CAN} you do with an empty can?

Filed Under: Uncategorized

← Free Holiday Gift Tracker Glitter Thank You Card and Silhouette Deal →

Comments

  1. Αθηνά says

    October 11, 2013 at 6:54 am

    This is sooo cute! We don’t celebreta Halloween in Greece but I love this day! I wish I lived in USA to make all that “scary” stuff for this day!
    Athina from Craftaholic (http://craftaholicenglish.blogspot.gr/)

    Reply
  2. Stephanie Chan says

    October 11, 2013 at 3:35 pm

    Adorable and fun! I love Mod Podge!

    Reply
  3. Tara @ Suburble says

    October 11, 2013 at 4:21 pm

    I love love LOVE Mod Podge Outdoor. I think it’s probably my favourite Mod Podge. This bucket is too cute!

    Reply
  4. Preeti Mittal says

    October 12, 2013 at 5:50 am

    Very creative and lovely tutorial. I would surely like to make party bucket. Kids are surely gonna like it.

    Alice in Wonderland Party Characters

    Reply
  5. Ashley Phipps says

    October 12, 2013 at 4:02 pm

    So cute!!!

    Reply
  6. Kimber Ashley says

    October 13, 2013 at 3:18 am

    That is a great way to incorporate the holiday in outdoor decor! I always am challenged with that! Thank you!

    Reply
  7. Britni says

    October 14, 2013 at 10:28 pm

    I love that cute little ghost girl. Perfect.

    Reply
  8. completehousecare says

    October 16, 2013 at 6:26 am

    Thanks for posting all your party stuff and ideas for outdoor decor..I love those colorful buckets and cute small pumpkins..

    Reply
  9. Portella says

    August 26, 2019 at 3:20 pm

    Adorable project!

    Reply

Leave a Reply Cancel reply

Your email address will not be published. Required fields are marked *

CommentLuv badgeShow more posts

Welcome! {I’m Stacy.}


Good time, great laughs, and lots of crafts!
I am a full-time working momma of 2 adorable and funny and fully southern little ladies. I like to think that everyone has a crafty side, even if it's only kinda crafty.

{find it}

{follow via Email}

Enter your email address to subscribe to this blog and receive notifications of new posts by email.

Google+ Badge

{previous posts}

Rivit Media Publisher

{Popular Posts}

  • Time for a Quiz | Father's Day Free Printables
  • Custom Ribbon | How to Print on Ribbon
  • Camping Pillow Tutorial | Ann Kelle Fabrics
  • DIY Stripes and Glitter Mason Jar
  • Can We Play? | Last Day of School Cards

{Facebook}

Unable to display Facebook posts.
Show error

Error: (#200) Provide valid app ID
Type: OAuthException
Code: 200
Please refer to our Error Message Reference.

{Instagram}

{Pinterest}

Follow Me on Pinterest

Copyright © 2025 · Daily Dish Pro Theme on Genesis Framework · WordPress · Log in