Shes {kinda} Crafty

Dedicated to All Things {kinda} Crafty

  • Home
  • Blog
  • About Me
  • Shop
  • Wreaths
  • As Seen On
  • Privacy Policy

Print and Cut 101: Back to School Labels

August 14, 2014 By Stacy 1 Comment

Howdy friends! Today I am coming to you with one of my favorite featured to use on my Silhouette machine; the Print and Cut feature! I mean, anyone can make circle or square labels, once you’ve spent hours figuring out how to line up your printer with the template on your computer screen, but with the Silhouette CAMEO or Portrait you can make any size or shape label easily! Continue reading for a step by step tutorial on using the Print and Cut feature AND stay tuned for a very special deal if don’t already own a Silhouette CAMEO or Portrait.

If you’re looking for a great deal on a Silhouette CAMEO or Portrait, Silhouette has 2 great bundle deals going on right now, all you have to do is use the special code KINDA at checkout. These back to school bundles include enough different types of material to keep you busy for some time and will allow you to try out many of the machine and software’s functions. Each bundle includes the machine plus:
Chipboard
Printable Silver Foil
Printable Gold Foil
Printable White Sticker Paper (which I used to make these labels)
Printable Clear Sticker Paper
Printable Cotton Canvas
Adhesive Washi Sheets
Sketch Pens Basic Pack 

Ok, so now that you have your machine and your printable white sticker paper we are ready to go!

First, you can either import your own images to print or you can open the Silhouette Store inside Silhouette Studio and purchase a print and cut image. If you bring your own images in you will have to trace them so they are ready to cut. However, if you buy the print and cut files from the store they are ready to go.

This is how you filter and search for Print and Cut images. They will all have a small blue “P” in the corner of the image.

Second, turn the registration marks on. Turning the registration marks on will show you the workable surface you have left on your sticker paper. Those registration marks help the machine line up your sticker paper and guide it to where to cut. I like to load my workable surface up with as many designs or stickers as I am going to need. There is really no going back to reuse your sticker paper, so make it count!

Third, don’t forget you can zoom in to get a better feel for the sizing and design on your print and cut labels. You are free to use ANY fonts you have uploaded on to your computer!

Fourth, You MUST make sure that any of the text you added is not selected to cut. The best way to do this is to go to the Cut Style Window and make sure that ONLY the edges of your designs are going to cut. If you find any text or other graphics with a red line around them that you don’t want cut, just select the text/image and then click “No Cut.”

Fifth, once you are set with your label designs go ahead and send it to the printer. It will print out the needed registration marks. This photo got a little washed out but you can see the registration marks.

Sixth, line up the corner of your sticker paper with the upper left hand corner of your cutting mat. Make sure that the filled in square is in the upper left hand corner. It will not work if you position it anywhere else. Pick the cut settings for the “Printable Sticker Paper” and let ‘er rip. I mean cut. Once you’ve taken off all the “extra” sticker paper, or weeded the design, you should be left with this – a sheet of personalized labels!!

However, if you don’t pay attention to what your blade is set at this is what you will be left with. They can still be used it’s just a tad bit tougher to get the backing of the labels.

Seventh, and final, step – start labeling anything that will sit still.

Make sure no one takes your books!

Or your composition book!

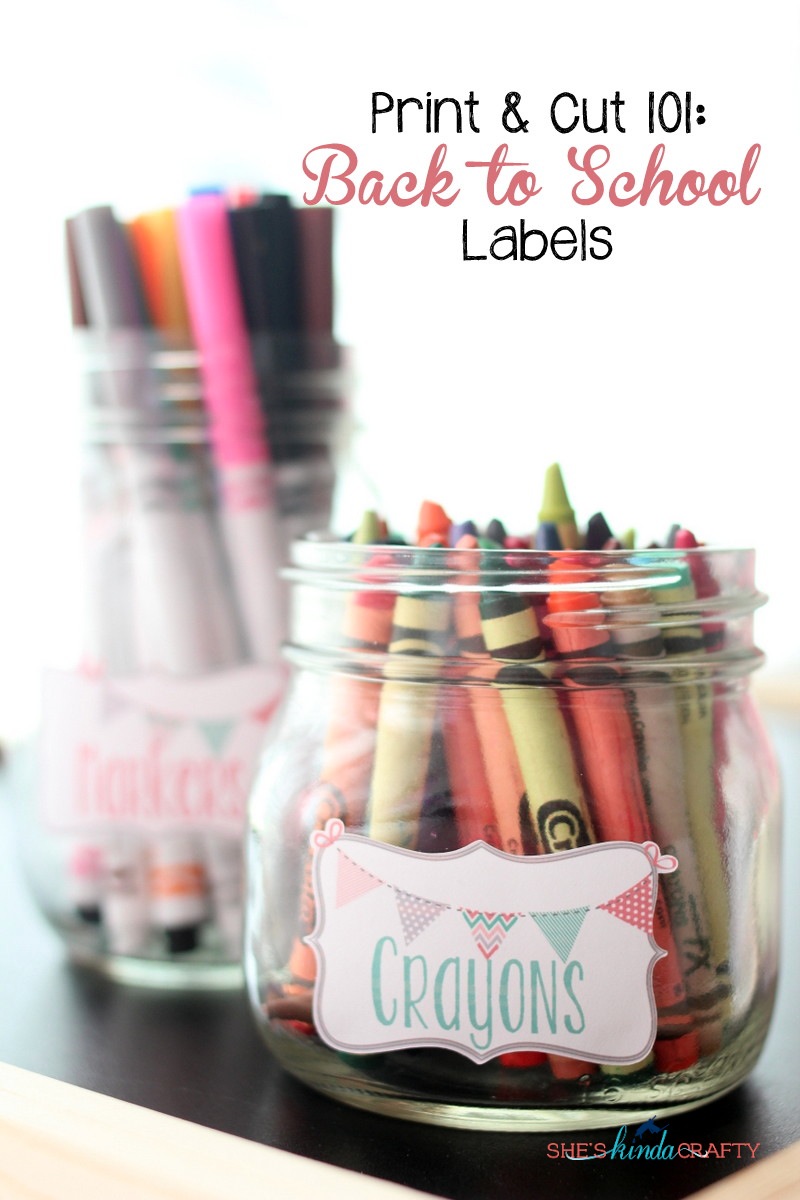
These labels are great to create an organized art or homework station; just stick them on some mason jars!

We even now have a place to store all of our sight word flashcards.

If you have any questions about how to use Print and Cut or if you want to know more about either of the Silhouette cutting machines please leave me a comment or drop me an e-mail!

Related posts:

Default Thumbnail#TBT (Throwback Thursday) Print and Cut Tutorial Default ThumbnailBack to School with Michaels | Ombre Command Center Default ThumbnailBack to School Free Printables Default ThumbnailThe Write Stuff | Back to School Printable

Filed Under: Back to School, craft tips, DIY, kids, mason jars, Silhouette, tutorial

← Free Printable Spirit Banner I Love Florida Football Wreath →

Comments

  1. Bethany Lee says

    August 14, 2014 at 8:25 pm

    So cute!

    Reply

Leave a Reply Cancel reply

Your email address will not be published. Required fields are marked *

CommentLuv badgeShow more posts

Welcome! {I’m Stacy.}


Good time, great laughs, and lots of crafts!
I am a full-time working momma of 2 adorable and funny and fully southern little ladies. I like to think that everyone has a crafty side, even if it's only kinda crafty.

{find it}

{follow via Email}

Enter your email address to subscribe to this blog and receive notifications of new posts by email.

Google+ Badge

{previous posts}

Rivit Media Publisher

{Popular Posts}

  • Time for a Quiz | Father's Day Free Printables
  • Custom Ribbon | How to Print on Ribbon
  • Camping Pillow Tutorial | Ann Kelle Fabrics
  • Can We Play? | Last Day of School Cards
  • DIY Stripes and Glitter Mason Jar

{Facebook}

Unable to display Facebook posts.
Show error

Error: (#200) Provide valid app ID
Type: OAuthException
Code: 200
Please refer to our Error Message Reference.

{Instagram}

{Pinterest}

Follow Me on Pinterest

Copyright © 2025 · Daily Dish Pro Theme on Genesis Framework · WordPress · Log in