Shes {kinda} Crafty

Dedicated to All Things {kinda} Crafty

  • Home
  • Blog
  • About Me
  • Shop
  • Wreaths
  • As Seen On
  • Privacy Policy

How to Make a Split Pumpkin Monogram | September Silhouette Special

September 16, 2014 By Stacy 4 Comments

Disclosure: This post is part of my affiliation with Silhouette America. The thoughts and ideas that I share, along with my love for the machine, are 100% my own. 
Happy middle of September already everyone! I honestly can’t believe the month is half over and I also saw something on Facebook this morning about 100 days til Christmas? How can that even be? Well since we have half way through September it’s a great time to start thinking about Halloween and Autumn crafts so I am here to show you how you can make your own Split Pumpkin Monogram. The best part of this tutorial and that you can apply it to any shape for any holiday or season or party or whatever you want! Also, I am sharing a great September promotion from Silhouette today that lasts through the end of the month!!

I am going to go through the designing of the decal step by step in Silhouette Studio. If you need any tips on applying the decals please read my Vinyl Layering 101 post.  You can click on any of the photos to enlarge the details.

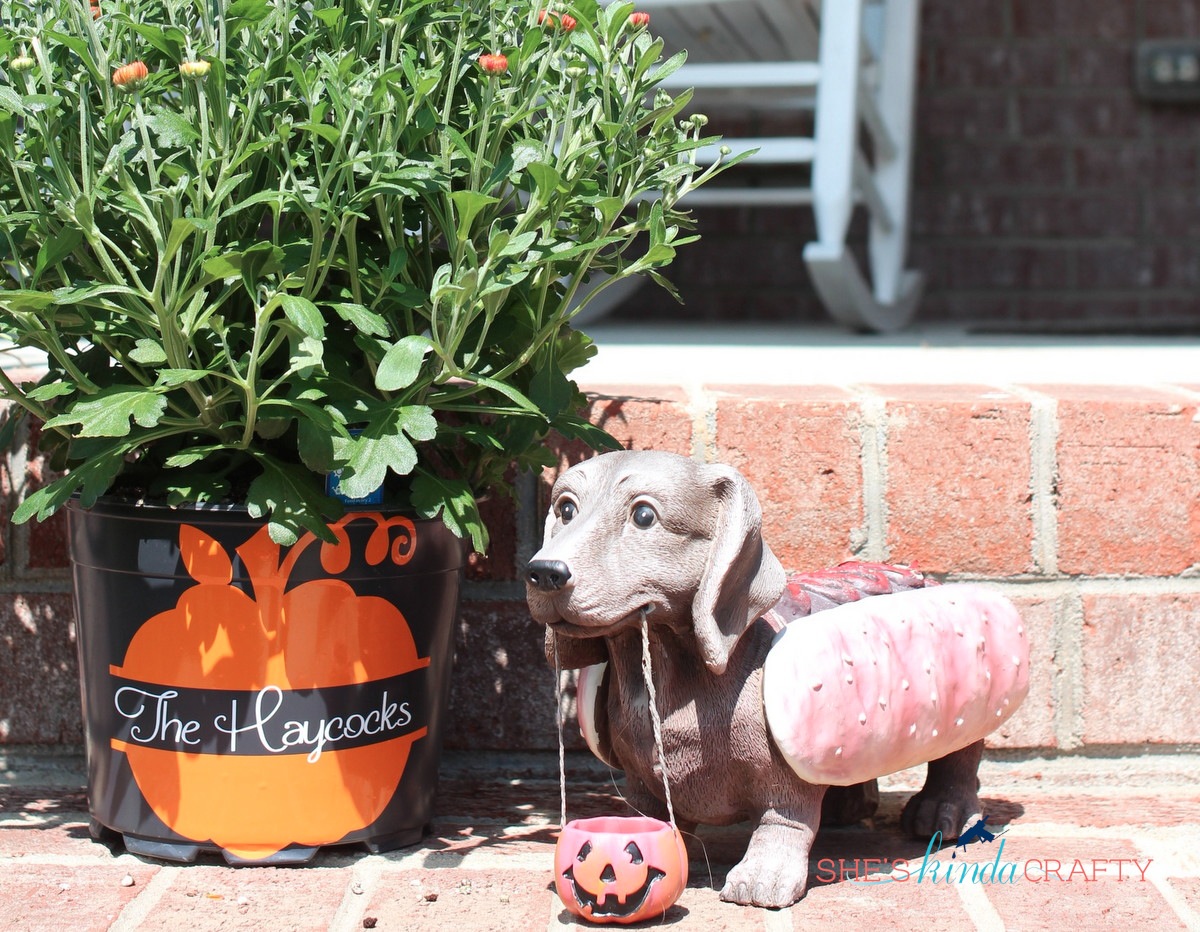
Step 1) Pick your design – this one is called Pumpkin Silhouette and I purchased it in the online store for $0.99 – you don’t need to worry about size yet. (I changed the color of the shape to better stand out in this tutorial, you do not have to fill in a color.)

Step 2) Draw a rectangle the height of the wording you’d like to put in the pumpkin and a width that overlaps the edges. I picked about 1.75 inches tall. (Again, I am using the green for the tutorial visual)

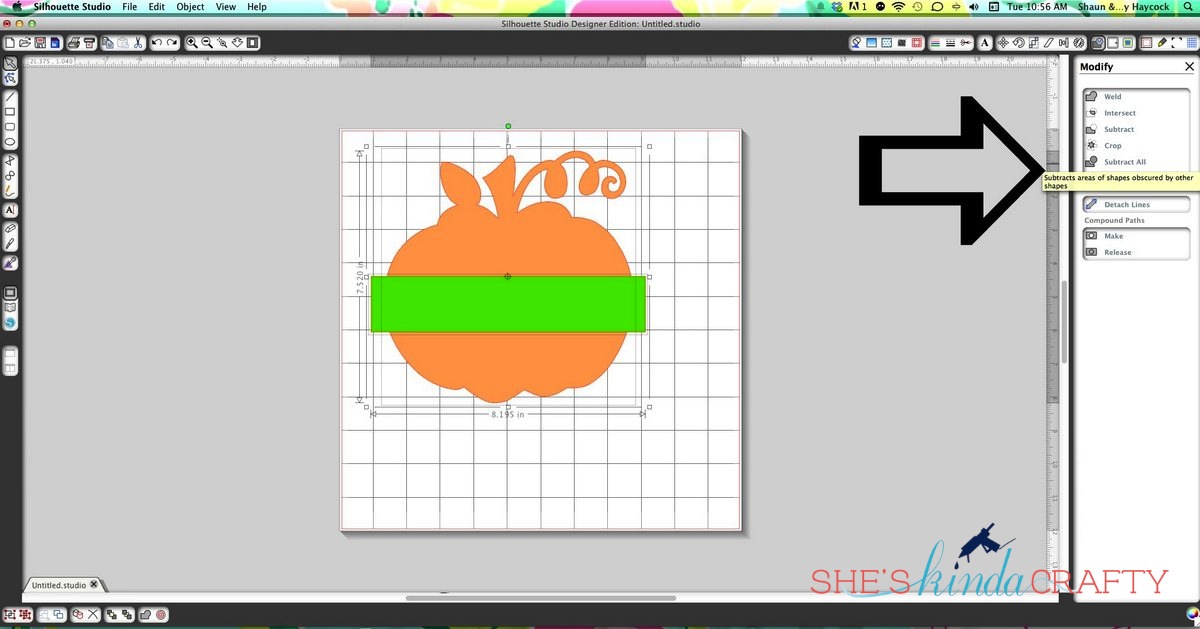
3) Select both images (the pumpkin and the rectangle) by holding the shift key and clicking on each one and then under the modify menu click on “Subtract.”

4) Remove the rectangle from your pumpkin. You discard the shape or you can use it as your guide to option step 5.

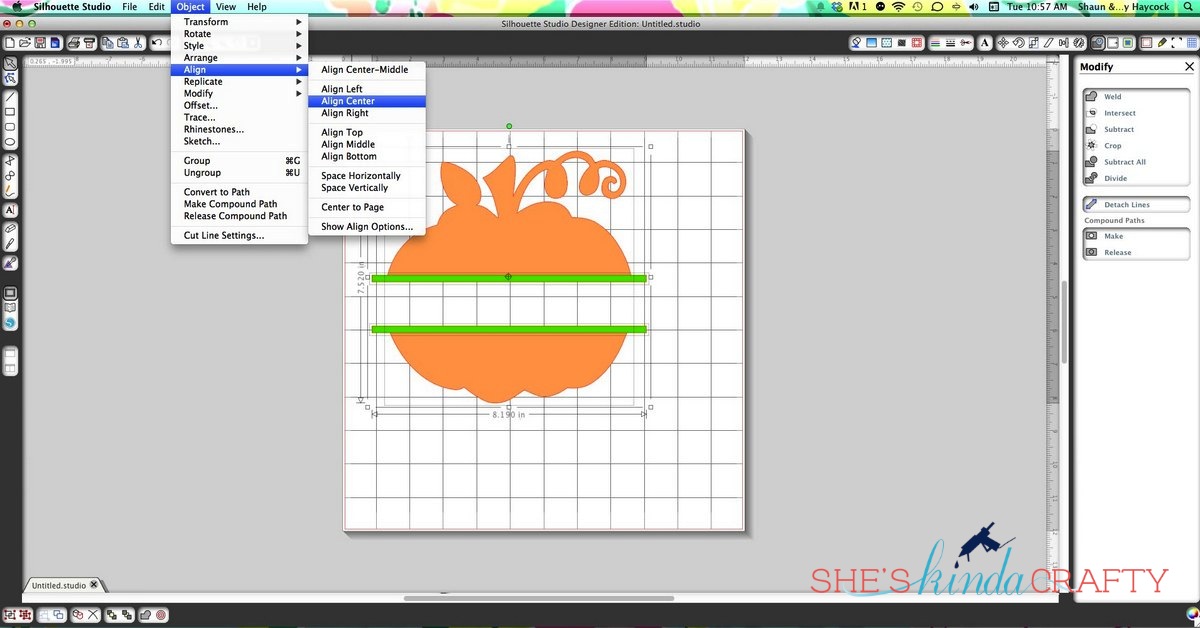
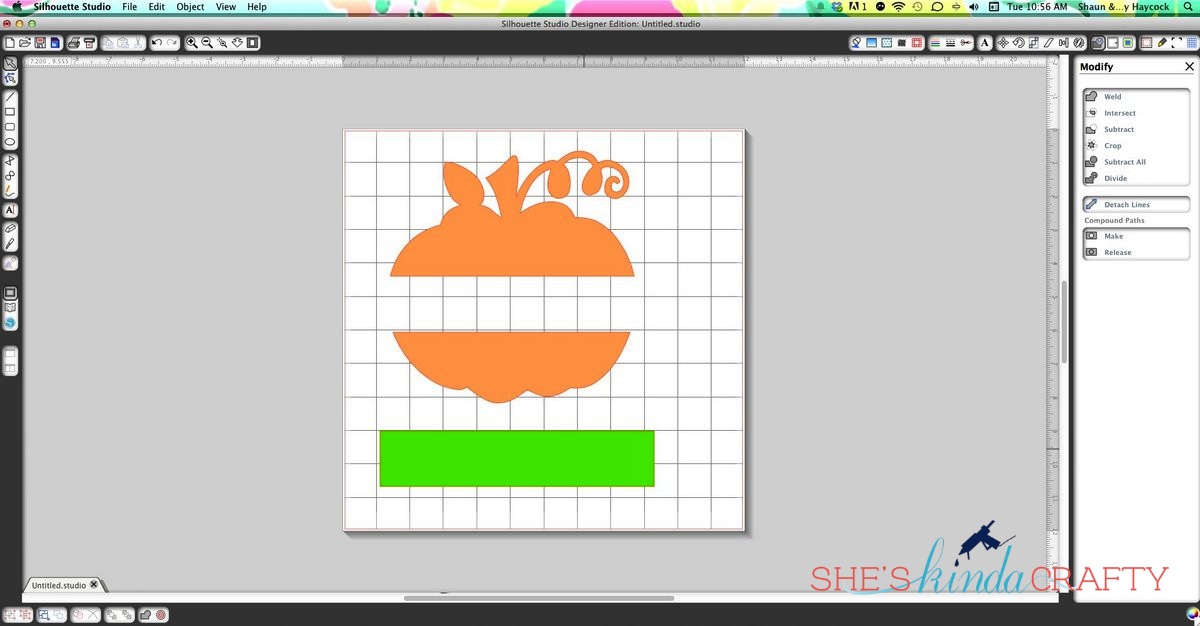
5) (optional, skip 8 if you do not want the extended lines) Create a long, skinny (maybe .25 inch high) rectangle that overlaps the edges of the pumpkin. Copy and paste that rectangle so you now have 2 identical shapes. Place each of the skinny rectangles on the open ends of your pumpkin pieces. To make sure everything is centered select all 3 images (holding the shift key) and then select Object>Align>Align Center.

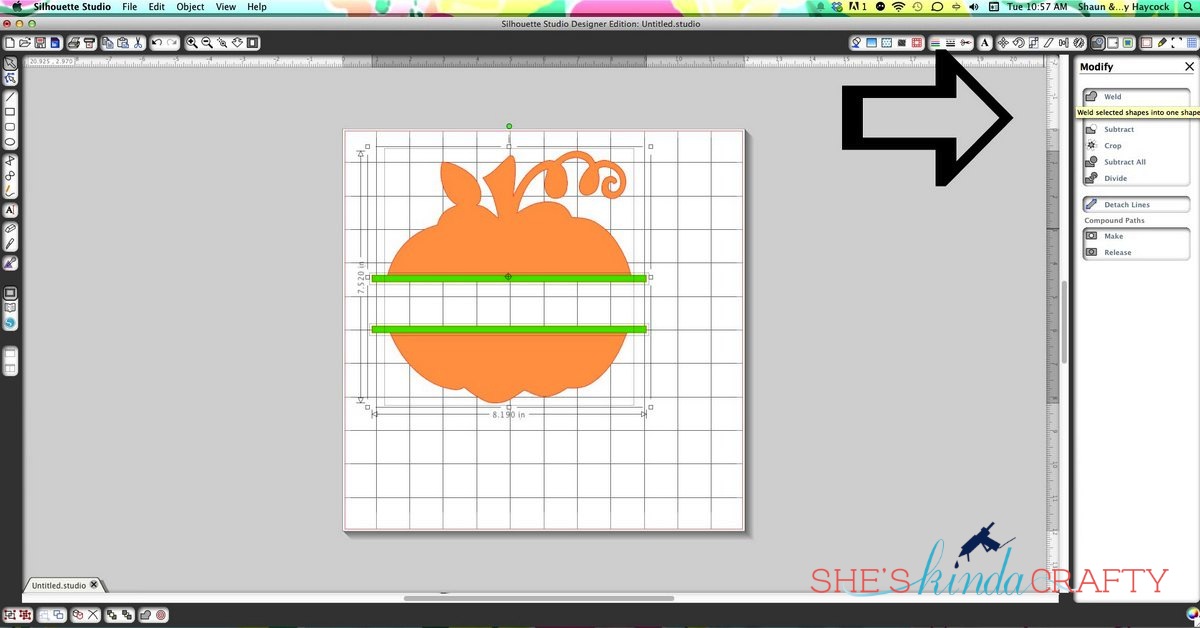
6) Now that everything is centered you can weld the shapes together so everything cuts as one. With all 3 shapes selected in the Modify menu click on “Weld.”

7) Once you’ve selected Weld you will now have only 2 pieces to your pumpkin (and SS will color them all the same so you can see that it is no just one image).

8) Now comes the hard part – selecting your font! I used Frosting for Breakfast to write out our family name. Play with the sizing until your personalization fits in the center of the pumpkin.
9) From here you’ll just want to cut your pieces out of vinyl and use transfer paper or contact paper to apply your decal to any surface you’d like!
 Before.
After!!
If you don’t have a Silhouette yet and are hoping to make beautiful and personalized holiday gifts for all your friends and family this year, Silhouette America has a wonderful deal on a Portrait right now! Just remember to use the code word KINDA at check out to redeem the special!

And if you do already have a CAMEO or Portrait they also have this great deal for Adhesive Cardstock going on, too.


Again, you’ll have to use the code word KINDA at check out to redeem either of these deals!
If you have any questions or get stuck along the way please leave me a comment and I will reply as quickly as I can to assist you!
Happy Personalizing!!

Related posts:

Make Subway Art from Silhouette Store Files Easy Pumpkin Carving with Pumpkin Masters Felt {Pumpkin} Chair Backs Typography Signs 201 + Silhouette Promotion
YARPP

Filed Under: Craft Supplies, craft tips, DIY, halloween, Holidays, home decor, Silhouette, tutorial

← Reversible Fall Front Porch Pillows Magnetic Halloween Storyboard →

Comments

  1. Heather says

    September 17, 2014 at 1:33 pm

    Thanks so much for sharing this! I love your blog!

    Reply
    • Stacy Haycock says

      September 27, 2014 at 8:30 pm

      Thank you Heather!

      Reply
  2. Danielle Miller says

    September 17, 2014 at 1:47 pm

    I need to make this!

    Reply
  3. Emily Dixon says

    December 11, 2014 at 6:22 pm

    Thanks for the tutorial!!

    Reply

Leave a Reply Cancel reply

Your email address will not be published. Required fields are marked *

CommentLuv badgeShow more posts

Welcome! {I’m Stacy.}


Good time, great laughs, and lots of crafts!
I am a full-time working momma of 2 adorable and funny and fully southern little ladies. I like to think that everyone has a crafty side, even if it's only kinda crafty.

{find it}

{follow via Email}

Enter your email address to subscribe to this blog and receive notifications of new posts by email.

Google+ Badge

{previous posts}

Rivit Media Publisher

{Popular Posts}

  • Tips and Tricks for Painting Mason Jars
  • Camping Pillow Tutorial | Ann Kelle Fabrics
  • Baby Boy {Burp} Cloths!
  • Vinyl Layering 101 | A Silhouette Tutorial
  • Custom Ribbon | How to Print on Ribbon

{Facebook}

Unable to display Facebook posts.
Show error

Error: Error validating application. Application has been deleted.
Type: OAuthException
Code: 190
Please refer to our Error Message Reference.

{Instagram}

{Pinterest}

  • Amazing Girls Dragon Braid Hairstyle DIY Tutorial - Video
  • Thursday- Shoulders & Traps: my visual workout created at WorkoutLabs.com • Click through to customize and download as a FREE PDF! #customworkout
  • Strengthening Shoulder Workout to Prevent Injuries and Promote Healing #shoulderpain
  • 10 Effective Physical Therapy Exercises To Treat Shoulder Pain
Follow Me on Pinterest

Copyright © 2019 Shes Kinda Crafty • Website Design by Brave Creative Design · Log in