Shes {kinda} Crafty

Dedicated to All Things {kinda} Crafty

  • Home
  • Blog
  • About Me
  • Shop
  • Wreaths
  • As Seen On
  • Privacy Policy

Using Double Sided Adhesive Paper to add Pizzazz

November 6, 2014 By Stacy Leave a Comment

To all my readers who have seen Frozen, which I am guessing is most of you, I am sorry for the earworm I am about to implant with this next project. Just know that it’s all worth it to see how you can make this great winter sign! A winter sign with a dash of pizzazz thanks to using double sided adhesive paper! 

Disclaimer: This is not a paid ad, it is just a tutorial from me showing you how I use one of my favorite products. This post does, however, include affiliate links.

This project started out like many others of mine, perusing the Silhouette Online Store late at night while watching TV. When I saw this design, I just knew I had to buy it even though I wasn’t really sure how I would use it. The next day, however, I knew exactly what I was going to do with it – search through my husband’s scrap wood pile in the garage and make it into a sign!

After prepping (sanding) and painting the board I cut out the sign letters in brown and red vinyl and applied them to my sign board. If you need tips, tricks, and tutorial on how to make a typography sign using your Silhouette machine you can read my post Make Subway Art from Silhouette Store Files.

Here is what the sign looked like before. It’s cute, but a little plain.

I could have just painted a circle with Mod Podge onto the center on the sign but 1) there is no way it would be perfectly circle 2) I didn’t know how it would all stick, and stay, to the glossy outdoor vinyl I used and 3) I didn’t want glitter all over my sign.

So I flipped through all my specialty papers until I found the double-sided adhesive sheets that I had purchased a while ago from Silhouette (probably when they had a 40% off sale, which is when I like to stock up…usually around black Friday).

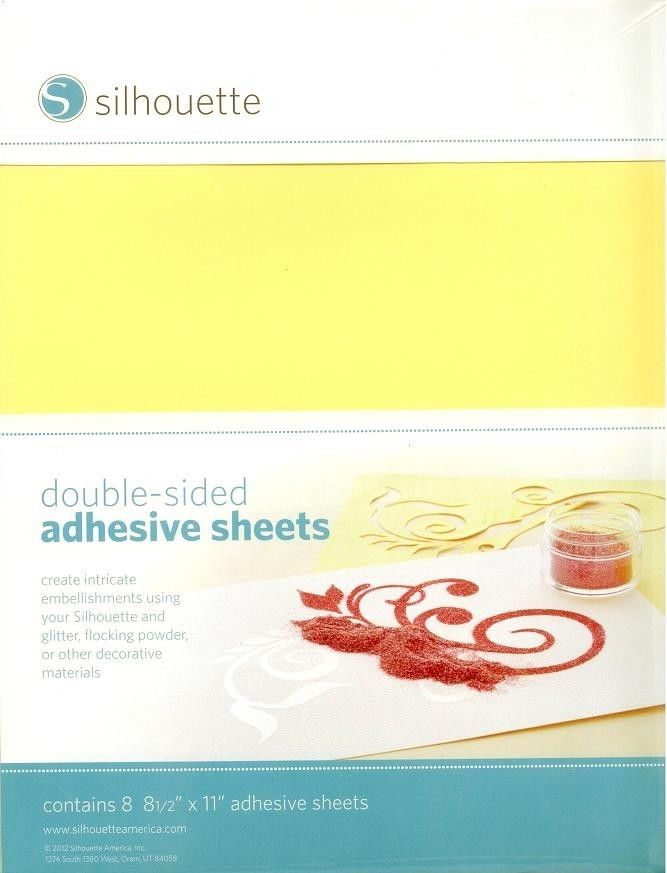
This material is great, you can run it right through your machine, peel off the top, white layer, add your glitter, then peel of the back, yellow layer and stick it anywhere you want!

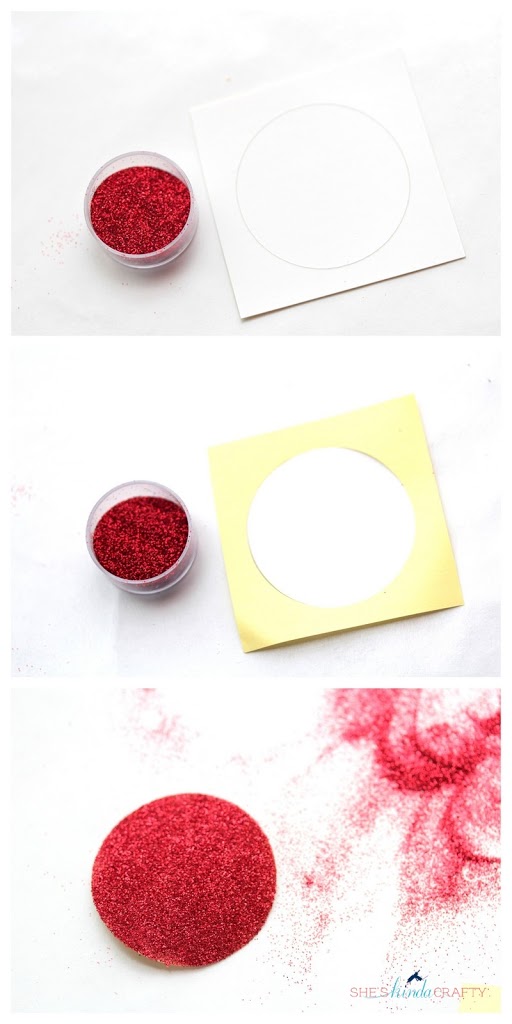
And now you have the perfectly glittered ruby red circle to turn this great song lyric from Kristoff into a Christmastime themed sign!

linked up: tatertots and jello, SNAP

Related posts:

Default ThumbnailTulip Shimmer | Double Duty {Glitter} Holiday Napkins Default ThumbnailTypography Signs 201 + Silhouette Promotion DIY Stripes and Glitter Mason Jar Rudolph Wreath and 14 more Amazing Wreaths

Filed Under: Christmas, DIY, Holidays, home decor, Silhouette

← Rudolph Wreath and 14 more Amazing Wreaths DIY Stripes and Glitter Mason Jar →

Leave a Reply Cancel reply

Your email address will not be published. Required fields are marked *

CommentLuv badgeShow more posts

Welcome! {I’m Stacy.}


Good time, great laughs, and lots of crafts!
I am a full-time working momma of 2 adorable and funny and fully southern little ladies. I like to think that everyone has a crafty side, even if it's only kinda crafty.

{find it}

{follow via Email}

Enter your email address to subscribe to this blog and receive notifications of new posts by email.

Google+ Badge

{previous posts}

Rivit Media Publisher

{Popular Posts}

  • Time for a Quiz | Father's Day Free Printables
  • Custom Ribbon | How to Print on Ribbon
  • Camping Pillow Tutorial | Ann Kelle Fabrics
  • Can We Play? | Last Day of School Cards
  • DIY Stripes and Glitter Mason Jar

{Facebook}

Unable to display Facebook posts.
Show error

Error: (#200) Provide valid app ID
Type: OAuthException
Code: 200
Please refer to our Error Message Reference.

{Instagram}

{Pinterest}

Follow Me on Pinterest

Copyright © 2025 · Daily Dish Pro Theme on Genesis Framework · WordPress · Log in