Shes {kinda} Crafty

Dedicated to All Things {kinda} Crafty

  • Home
  • Blog
  • About Me
  • Shop
  • Wreaths
  • As Seen On
  • Privacy Policy

Typography Signs 201 + Silhouette Promotion

July 22, 2014 By Stacy Leave a Comment

A couple week ago I showed you how you can make subway, or typography, art using files that can be purchased in the Silhouette Store. In that tutorial I simply cut the words out in vinyl and applied them to my sign. Today I am going to show you a slightly different, and more involved, variation of making typography art with a file I purchased from the Silhouette Store. I also have the details for the July special Silhouette promotion below that you can get with the code word KINDA!

Supplies:

Wood sign – I picked this one up at the craft store, pre-made
Vinyl & Cutting Machine – I use a Silhouette Cameo
Mod Podge
Paint
Paint brushes
First I bought this file from the Silhouette Store and sized the words to fit my sign and cut them out in vinyl. 
Then, using my cheap contact paper I talked about in my layering post, I started placing the vinyl words onto my sign. Make sure you really press down all the edges to get a good seal. I wanted my words to be in the natural wood color but you could always pre-paint your sign if you wanted them to be a different color.

Then I filled the other words. I won’t lie, this part was the hardest because I had chosen this pallet type sign and had to work with the gaps. I wasn’t able to put the words exactly where I would have liked.

Once you’ve placed all your vinyl on the sign, and given them a good rub down, comes the most important part: slather that baby in Mod Podge! I like to use a cheap foam brush when applying Mod Podge and for this project I just used a medium layer so it would dry quickly.

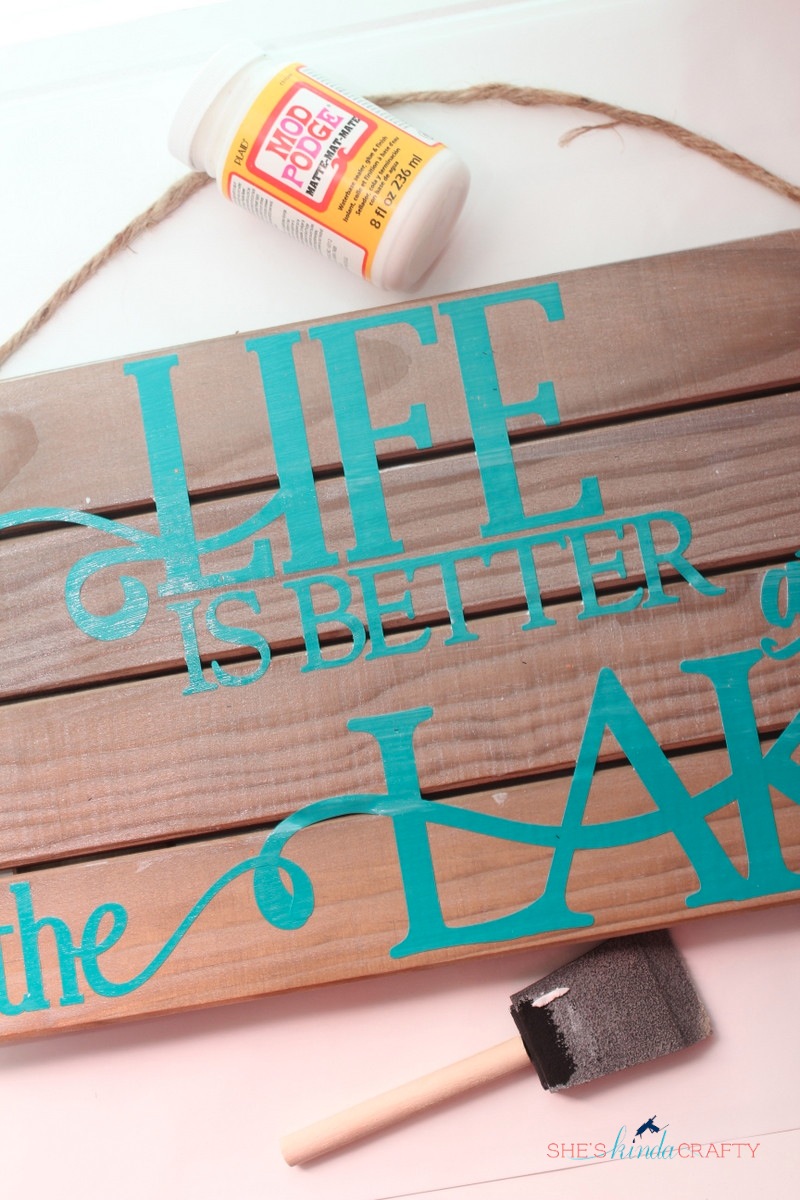
Give the Mod Podge about 20 minutes to dry and then go ahead and paint your entire sign. I kept it to one coat because that’s the look I was going for but you can put as many coats on as you need to achieve your desired look.

Here’s a close up.

I like to pull my vinyl stencil up before the paint is fully dry because I find you have less instances of the paint peeling. As you can see, using the Mod Podge really sealed the stencil to the sign and the final result is as crisp as you can get it!

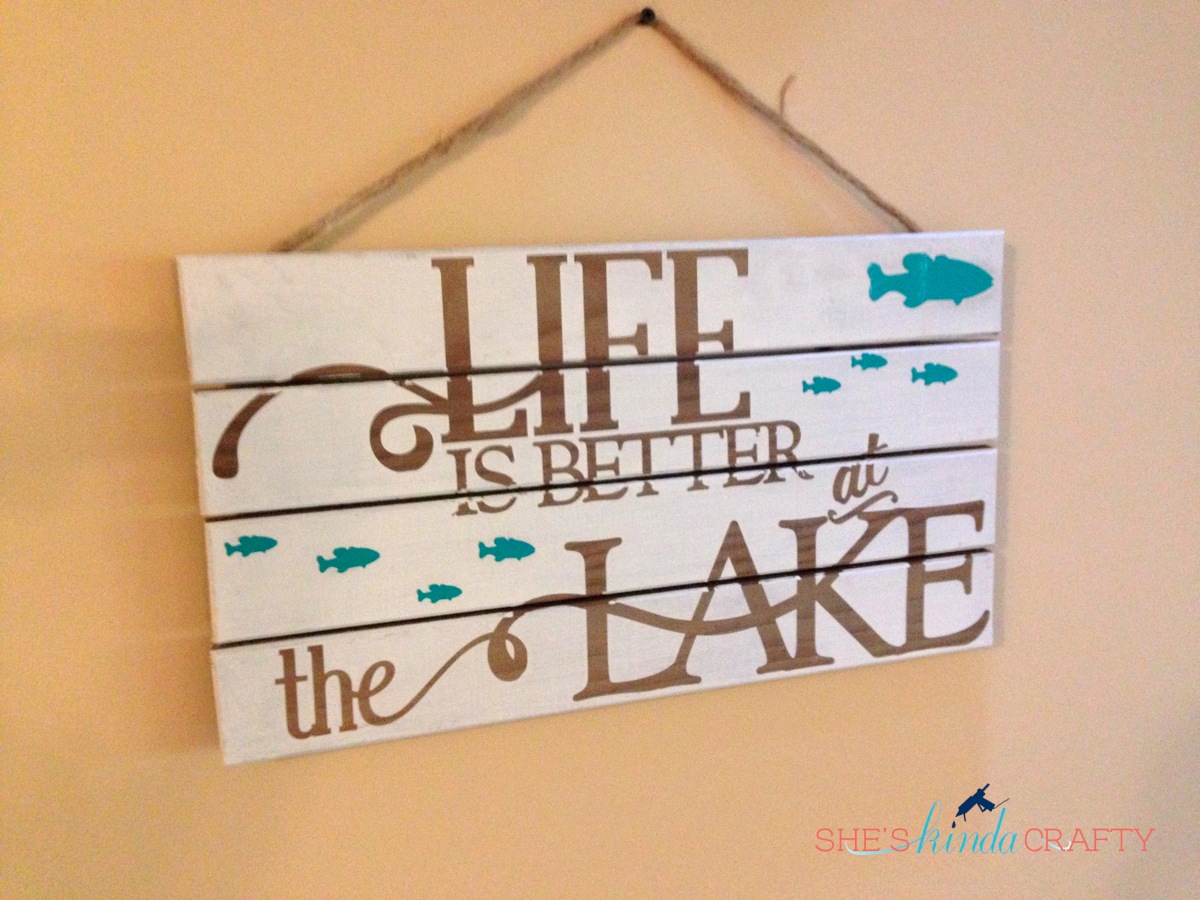
I added a couple little vinyl fish on top the finished sign to fill in some of the empty space I wasn’t happy with. Here is the sign hanging up in the lake house of our lovely weekend hosts. Once day we hope to own a lake house, too, but for now we love be invited down to the lake!

And just because I love this photo I look, my little one thinks that Like is Better at the Lake, too!

If you don’t have a Silhouette Cameo or Portrait yet and would like to get one, now is a great time. 

Included in the Promotion:
CAMEO bundle
1 Silhouette CAMEO
1 copy of Silhouette Studio Designer Edition
1 teal CAMEO dust cover
————
$269.99
Portrait bundle
1 Silhouette Portrait
1 copy of Silhouette Studio Designer Edition
1 grey Portrait dust cover
————
$149.99
Silhouette Studio Designer Edition: 40% off
Simply enter the promotion code “KINDA” at checkout for these great deals.
Silhouette Studio® Designer Edition contains all the same functionality as Silhouette Studio® plus the following designer features:
Ability to open, manipulate, and cut .svg files
Rhinestone tools to convert designs into rhinestone templates and create your own rhinestone designs
Sketch tools to convert designs into several styles of sketchable art
Creative knife tools to allow you to clip designs using different patterns
Enhanced eraser set to modify designs with more precision
Built-in ruler and guide lines for precise alignment and drawing
Layers support (including ability to cut by layer)
PDF import
Nesting feature to allow you to arrange cuts as efficiently as possible—a scrapper’s dream!
Shadow tool—allows you to add a drop shadow to printable designs
As always if you have any questions about the different machines or how they differ from other products out there don’t hesitate to leave a comment or email me!

Related posts:

Default ThumbnailMake Subway Art from Silhouette Store Files Default ThumbnailVinyl Layering 101 | A Silhouette Tutorial How to Make a Split Pumpkin Monogram | September Silhouette Special DIY Stripes and Glitter Mason Jar

Filed Under: craft tips, DIY, gift ideas, home decor, Silhouette, tutorial

← Mod Podge Collage Clay Decoden Frame Magical Lunch Boxes →

Leave a Reply Cancel reply

Your email address will not be published. Required fields are marked *

CommentLuv badgeShow more posts

Welcome! {I’m Stacy.}


Good time, great laughs, and lots of crafts!
I am a full-time working momma of 2 adorable and funny and fully southern little ladies. I like to think that everyone has a crafty side, even if it's only kinda crafty.

{find it}

{follow via Email}

Enter your email address to subscribe to this blog and receive notifications of new posts by email.

Google+ Badge

{previous posts}

Rivit Media Publisher

{Popular Posts}

  • Time for a Quiz | Father's Day Free Printables
  • Custom Ribbon | How to Print on Ribbon
  • Camping Pillow Tutorial | Ann Kelle Fabrics
  • Can We Play? | Last Day of School Cards
  • DIY Stripes and Glitter Mason Jar

{Facebook}

Unable to display Facebook posts.
Show error

Error: (#200) Provide valid app ID
Type: OAuthException
Code: 200
Please refer to our Error Message Reference.

{Instagram}

{Pinterest}

Follow Me on Pinterest

Copyright © 2025 · Daily Dish Pro Theme on Genesis Framework · WordPress · Log in